Quantcast
Channel: can-bus – Hackaday
Viewing all 56 articles
Browse latest View live

Modern car data systems lack security

$
0
0

Tomorrow a team of researchers will present their paper on Experimental Security Analysis of a Modern Automobile (PDF) at the IEEE Symposium on Security & Privacy. Much like the racing simulators we’ve seen they’re exploiting the ODB-II port to get at the vehicle’s Controller-area network, or CAN-bus. We’re not surprised at all that they can display custom text on the dashboard display or read sensor data from the car. What does surprise us is their exposé on how truly unsecured the system is. It seems that access to any device on the CAN-bus gives them unobstructed control of the car’s systems. Any device can send commands to any other device. They’ve even found a way to write malicious code to the car’s computer which can be programmed to erase itself in the event of a crash.

Much like RFID the security risks here are basically nill for the vast majority of consumers. We just find it a bit surprising that there’s apparently been little thought put into fortifying the communications between the safety systems such as the brakes on the vehicle. For instance, team experimented with sending random packets over the CAN-bus and stumbled across a way to lock the brake on just one wheel. To us it’s conceivable that a malfunctioning device on the network could start sending out damaged packets and cause a dangerous malfunction like this one.

The 14-page PDF linked above is a page-turner, check it out on your hacked ereader during lunch.


Filed under: security hacks, transportation hacks

Enhance your key fob via CAN bus hacking

$
0
0

can_bus_hacking

[Igor] drives a 4th generation Volkswagen Golf, and decided he wanted to play around with the CAN bus for a bit. Knowing that the comfort bus is the most accessible and the safest to toy with, he started poking around to see what he could see (Google translation).

He pulled the trim off one of the rear doors and hooked into the comfort bus with an Arudino and a CAN interface module. He sniffed the bus’ traffic for a bit, then decided he would add some functionality to the car that it was sorely lacking. The car’s windows can all be rolled down by turning the key in any lock for more than a few seconds, however this cannot be done remotely. The functionality can be added via 3rd party modules or through manipulating the car’s programming with some prepackaged software, but [Igor] wanted to give it a go himself.

He programmed the Arduino to listen for longer than normal button presses coming from the remote. Once it detects that he is trying to roll the windows up or down, the Arduino issues the proper window control commands to the bus, and his wish is the car’s command.

It’s a pretty simple process, but then again he has just gotten started. We look forward to seeing what else [Igor] is able to pull off in the future.  In the meantime, continue reading to see a quick video of his handiwork.

If you are interested in seeing what you might be able to do with your own car, check out this CAN  bus sniffer we featured a while back.


Filed under: transportation hacks

CAN bus for home automation

$
0
0

Here’s one node on the new home automation system on which [Black Rynius] is working. So far he’s testing out the system with just two nodes, but plans to build more as the project progresses. He’s chosen to use the CAN bus for communications; a protocol which is most commonly found in automotive applications.

The biggest plus about using the CAN bus is that it requires just one pair of wires for communications. As you can see, there’s an old doorbell included on this board and he’s hoping to use the existing doorbell wire to connect between nodes. Each unit includes a PIC 18F4580 which has a CAN engine built into it for easy protocol translation. There is also an MCP2551 which handles the transmissions. You can read a bit more about the hardware choices in his breadboarding post.

So far almost everything is working as planned. He’s able to send and receive data between the two boards including temperature from a sensor and time from a DS1305 RTC chip. The one thing that vexes him is that doorbell. It draws too much current for the wall wart that’s powering the board, browning out the microcontroller and causing a reset. That’s not a hard fix and we look forward to more developments in the near future.

[via Dangerous Prototypes]


Filed under: home hacks

Tinkering with ODB II and the CAN bus

$
0
0

[Debrah] is taking his next project out to the garage. He built his own CAN bus reader using a dsPIC.

The nice thing about working with Control Area Network is that it’s a universal standard found on every modern production line automobile. And because of this, the chip you need in order to communicate using that protocol will cost just over a dollar. [Debraj] chose the MCP2551, which comes in several different 8-pin packages. There is even an application note tailored for use with the dsPIC33F family.

The project is running on both 5V and 3.3V rails. This complicates things just a bit, but a level converter makes sure that there’s no communications problems between the chips. A four line character LCD acts as the output during the tests (you can see this in the clip after the break) but he’s already got a second version which looks quite a bit better on the dashboard.

What else can be done with this hack? Well, we’ve seen a method used to read control buttons from the steering wheel before. It all depends on what data your vehicle is transmitting and one way to find that out is to build some hardware and start logging the packets.http://www.youtube.com/watch?v=NHou_66MbgQ


Filed under: transportation hacks

Hacking the computer interface of a Ford Focus Mk2

$
0
0

You can do some neat stuff to the way your Ford Focus Mk2 works, but first you have to gain access to the data system. If you know some Russian, and don’t mind a bit of dongle rewiring, this guide will have you hacking the car’s CAN bus in no time. It was written by [Preee] and he has already added Radio RDS and CD Track information to the speedometer display panel, implemented hands free control for his cellphone, disabled the sounds the car makes when he goes into reverse, changed the door locking speed from 5mph to 10mph, and much more.

To gain access to the system you need hardware to bridge from a computer to the CAN bus. He hit eBay and bought an ELM327 cable which plugs into the On-Board Diagnostics port (ODBII). There are two different ways these dongles can be configured and since this isn’t the right one for the Focus he had to alter it. His hardware changes are illustrated in the second post of the forum thread. Instead of just switching over to the other configuration, he wired up a toggle switch to select between the two.

With hardware in place he grabbed some software and started hacking away. But as we hinted above, it’s not as simple as you might think. The software is in Russian. [Preee] did his best to add translations to a few screenshots, but it’s still going to be a bit of a bother trying to find your way around the GUI.

[Thanks Fred]


Filed under: transportation hacks

Electric vehicle peripheral controller for the masses

$
0
0

This juicy hunk of printed circuits is an open source controller for the peripherals of an electric car. It’s the product of a capstone project working on a vehicle aimed at urban commuting. There wasn’t a suitable non-proprietary module for controlling a car’s peripherals so the team built their own.

As far as we can tell this is not responsible for driving the vehicle itself. We assume there’s another piece of hardware which reads from the accelerator pedal, drives the motors accordingly, and handles things like regenerative braking. But there’s a lot of other things in a modern vehicle that need to be taken care of as well. Head, tail, and turn indicator lights must be switched. All of the dashboard controls (like the turn signal lever and the wiper blade speed settings) need to be monitored. Something needs to drive the door locks, and a system that reads the door ajar sensors and switches the dome light on and off must be handled. This is where the controller pictured above really shines.

The team has released all of the hardware information. The code is not yet available, but will be as soon as they’ve cleaned it up enough to package the first release candidate.


Filed under: green hacks, transportation hacks

Raspberry Pi replaces a Volvo nav system

$
0
0

rpi-replaces-volvo-nav

[Reinis] has a Volvo S80. One of the dashboard features it includes is a 6.5″ LCD screen which periscopes up to use as a navigation system. The problem is that Volvo stopped making maps for it around five years ago and there are no maps at all for Latvia where he lives. So it’s worthless… to you’re average driver. But [Reinis] is fixing it on his own by replacing the system with a Raspberry Pi.

That link leads to his project overview page. But he’s already posted follow-ups on hardware design and initial testing. He’s basing the design around a Raspberry Pi board, but that doesn’t have all the hardware it needs to communicate with the car’s systems. For this he designed his own shield that uses an ATmega328 along with a CAN controller and CAN transceiver. The latter two chips patch into the CAN bus on the car’s On Board Diagnostic system. We didn’t see much about the wiring, but the overview post mentions that the screen takes RGB or Composite inputs so he must be running a composite video cable from the trunk to the dashboard.


Filed under: gps hacks, Raspberry Pi, transportation hacks

Defcon presenters preview hack that takes Prius out of driver’s control

$
0
0

hacking-control-of-a-prius

This one’s a treasure trove of CAN bus hacks that will scare the crap out of an unsuspecting driver — or worse. [Charlie Miller] and [Chris Valasek] are getting ready to present their findings, which were underwritten by DARPA, at this year’s Defcon. They gave a Forbes reporter a turn in the driver’s seat in order to show off.

You’ve got to see the video on this one. We haven’t had this much fun looking at potentially deadly car hacking since Waterloo Labs decided to go surfing on an Olds. The hacks shown off start as seemingly innocent data tweaks, like misrepresenting your fuel level or displaying 199 mph on the speedometer while the car is standing still. But things start to get interesting when they take that speed readout from 199 down to zero instantly, which has the effect of telling the car you’ve been in a crash (don’t worry, the airbags don’t fire). Other devilish tricks include yanking the steering wheel to one side by issuing a command telling the car to park itself when driving down the road. Worst of all is the ability to disable the brakes while the vehicle is in motion. Oh the pedal still moves, but the brake calipers don’t respond.

The purpose of the work is to highlight areas where auto manufacturers need to tighten up security. It certainly gives us an idea of what we’ll see in the next Bond film.

[Thanks Matt]


Filed under: transportation hacks

GEVCU – an Open Generalized Electric Vehicle Control Unit

$
0
0

At Hackaday we’re very happy to see the increasing number of open hardware devices that appear everyday on the internet, and we’re also quite thrilled about open-source electric cars. Pictured above is the GEVCU, an open source electric vehicle control unit (or ECU). It is in charge of processing different inputs (throttle position, brake pressure, vehicle sensors) then send the appropriate control commands to electric motor controllers (aka inverters) via CAN bus messages or digital / PWM signals.

The project started back in December 2012 and was originally based on an Arduino Due. Since then, the GEVCU went through several revisions and ultimately a complete custom board was produced, while still keeping the Cortex M3 ATSAM3X8E from the Due. As you may have guessed, the board also includes a Wifi transceiver so users may adjust the ECU parameters via a web based platform. All resources may be downloaded from the official GitHub.


Filed under: Arduino Hacks, ARM, hardware

A Geiger Counter for an Off-Road Apocalypse Vehicle

$
0
0

prog2

If the world comes to an end, it’s good to be prepared. And let’s say that the apocalypse is triggered by a series of nuclear explosions. If that is the case, then having a Geiger counter is a must, plus having a nice transport vehicle would be helpful too. So [Kristian] combined the two ideas and created his own Geiger counter for automotive use just on the off chance that he might need it one day.

It all started with a homemade counter that was fashioned together. Then a display module with a built-in graphics controller that was implemented to show all kinds of information in the vehicle. This was done using a couple of optocouplers as inputs. In addition, a CAN bus interface was put in place. As an earlier post suggests, the display circuit was based on a Microchip 18F4680 microcontroller. After that, things kind of got a little out of control and the counter evolved into more of a mobile communications center; mostly just because [Kristian] wanted to learn how those systems worked. Sounds like a fun learning experience! Later the CPU and gauge was redesigned to use low-quiescent regulators. A filtering board was also made that could kill transients and noise if needed.

The full project can be seen on [Kristian]‘s blog.


Filed under: transportation hacks

Speaking CAN With Open Source Hardware

$
0
0

You can buy a dongle with a weird industrial connector that fits under the dash of any car on the road for $15. This is just a simple ODB-II transceiver meant for reading error codes and turning a Crown Vic into a police interceptor. There’s a lot more to the CAN Bus than OBD-II; robots and industrial control units, for instance, and Hackaday alum [Eric] has developed an open source tool for all things CAN.

[Eric] built this tool because of a lac of open-source tools that can talk CAN. There are plenty of boards floating around that can reset codes in a car using OBD-II, but an open hardware CAN device doesn’t really exist.

The CANtact is a small board outfitted with a USB port on one end, a DE-9 port on the other, and enough electronics to talk to any CAN device. The hardware on the CANtact is an STM32F0 – an ARM Cortex M0 that comes with USB and CAN interfaces. This chip connects to a Microchip CAN transceiver, and that’s pretty much all you need to talk to cars and industrial automation equipment. If doing something legal, moral, or safe with the CAN bus in your car isn’t your thing, Wired reports you can digitally cut someone’s brake lines.

On the software side of things, the CANtact can interface with Wireshark and the CANard Python library. All the files, from hardware to software, are available on the Github. Oh, CANtact was at Black Hat Asia, which means [Eric] was at Black Hat Asia. We should have sent stickers with him.


Filed under: car hacks

A Real Dash For A Truck Simulator

$
0
0

[Leon] plays Euro Truck Simulator 2, and like any good simulator, there are people out there building consoles, cockpits, and dashboards. In [Leon]’s case, he wanted a dashboard for his virtual trucks and cobbled one together out of a dash taken from a VW Polo.

This project was inspired by [Silas Parker] and his Arduino-based dashboard made out of a cardboard box, some servos, and a few LEDs. It worked, but [Leon] realized just about every dashboard made in the last decade or so has a CAN bus. You can just buy a CAN bus shield for an Arduino, and a dashboard can be easily found at any junkyard.

Right now, [Leon] is in the process of finding the CAN bus addresses of the relavent dials and LEDs on the dashboard. He found the tachometer at 0x280, and a bunch of indicator lights can be found at 0x470. Combined with a standard computer steering wheel and the telemetry SDK for Euro Truck Simulator 2, [Leon] has the beginnings of a virtual big rig on his desk.


Filed under: transportation hacks

Instrument Cluster Clock Gets The Show On The Road

$
0
0

While driving around one day, [Esko] noticed that the numbers and dials on a speedometer would be a pretty great medium for a clock build. This was his first project using a microcontroller, and with no time to lose he got his hands on the instrument cluster from a Fiat and used it to make a very unique timepiece.

The instrument cluster he chose was from a diesel Fiat Stilo, which [Esko] chose because the tachometer on the diesel version suited his timekeeping needs almost exactly. The speedometer measures almost all the way to 240 kph which works well for a 24-hour clock too. With the major part sourced, he found an Arduino clone and hit the road (figuratively speaking). A major focus of this project was getting the CAN bus signals sorted out. It helped that the Arduino clone he found had this functionality built-in (and ended up being cheaper than a real Arduino and shield) but he still had quite a bit of difficulty figuring out all of the signals.

In the end he got everything working, using a built-in servo motor in the cluster to make a “ticking” sound for seconds, and using the fuel gauge to keep track of the minutes. [Esko] also donated it to a local car museum when he finished so that others can enjoy this unique timepiece. Be sure to check out the video below to see this clock in action, and if you’re looking for other uses for instrument clusters that you might have lying around, be sure to check out this cluster used for video games.

The mechanics in dashboards are awesome, and produced at scale. That’s why our own [Adam Fabio] is able to get a hold of that type of hardware for his Analog Gauge Stepper kit. He simply adds a 3D printed needle, and a PCB to make interfacing easy.


Filed under: car hacks, clock hacks

How Those Hackers Took Complete Control of That Jeep

$
0
0

It was an overcast day with temperatures in the mid seventies – a perfect day to take your brand new Jeep Cherokee for a nice relaxing drive. You and your partner buckle in and find yourselves merging onto the freeway just a few minutes later.  You take in the new car smell as your partner fiddles with the central touch screen display.

“See if it has XM radio,” you ask as you play with the headlight controls.

Seconds later, a Taylor Swift song begins to play. You both sing along as the windows come down. “Life doesn’t get much better than this,” you think. Unfortunately, the fun would be short lived. It started with the windshield wipers coming on – the dry rubber-on-glass making a horrible screeching sound.

“Hey, what are you doing!”

“I didn’t do it….”

You verify the windshield wiper switch is in the OFF position. You switch it on and off a few times, but it has no effect. All of the sudden, the radio shuts off. An image of a skull and wrenches logo appears on the touchscreen. Rick Astley’s “Never Gonna Give You Up” begins blaring out of the speakers, and the four doors lock in perfect synchronization. The AC fans come on at max settings while at the same time, you feel the seat getting warmer as they too are set to max. The engine shuts off and the vehicle shifts into neutral. You hit the gas pedal, but nothing happens. Your brand new Jeep rolls to a halt on the side of the freeway, completely out of your control.

Sound like something out of a Hollywood movie? Think again.

[Charlie Miller], a security engineer for Twitter and [Chris Valasek], director for vehicle safety research at IOActive, were able to hack into a 2014 Jeep Cherokee via its wireless on-board entertainment system from their basement. A feature called UConnect, which allows the vehicle to connect to the internet via a cellular connection, has one of those things you might have heard of before – an IP address. Once the two hackers had this address, they had the ‘digital keys’ to the Jeep. From there, [Charlie] and [Chris] began to tinker with the various firmwares until they were able to gain access to the vehicle’s CAN bus. This gives them the ability to control many of the car’s functions, including (under the right conditions) the ability to kill the brakes and turn the steering wheel. You probably already have heard about the huge recall Chrysler issued in response to this vulnerability.

But up until this weekend we didn’t know exactly how it was done. [Charlie] and [Chris] documented their exploit in a 90 page white paper (PDF) and spoke at length during their DEF CON talk in Las Vegas. That video was just published last night and is embedded below. Take look and you’ll realize how much work they did to make all this happen. Pretty amazing.

If you do have a Jeep Cherokee in your garage – not to worry. The two hackers have been working closely with Chrysler, who have in turn released updates to prevent this kind of hack from happening. Just make sure you update your firmware.

Thanks to [Robert Marshall] for the tip.


Filed under: car hacks, security hacks

Open source OBD-II Adapter

$
0
0

Automotive diagnostics have come a long way since the “idiot lights” of the 1980s. The current version of the on-board diagnostics (OBD) protocol provides real time data as well as fault diagnostics, thanks to the numerous sensors connected to the data network in the modern vehicle. While the hardware interface is fairly standardized now, manufacturers use one of several different standards to encode the data. [Alex Sidorenko] has built an open source OBD-II Adapter which provides a serial interface using the ELM327 command set and supports all OBD-II standards.

The hardware is built around the LPC1517 Cortex-M3 microprocessor and can accept a couple of different versions. Here’s the PDF schematic, and a set of Gerber files (ZIP archive) for the PCB layout, if you’d like to dig in to it’s internals. The MC33660 ISO K Line Serial Link Interface device is used to provide bi-directional half-duplex communication interface with the micro-controller. Also included is the TJF1051, a high-speed CAN transceiver that provides an interface between the micro controller and the physical two-wire CAN lines on the ODB-II connector. The serial output from the adapter board is connected to a computer using a serial to USB adapter.

The software is written in C++ for the LPCXpresso IDE – a GNU tool chain for ARM Cortex-M processors, but can also be compiled using a couple of other toolchains. He’s got instructions if you’d like to build the firmware from source, or if you’d like to program the adapter via Flash Magic.

We featured [Alex]’s inexpensive PIC based ODB-II interface way back in 2007, so he’s been working on this for a while and has a good grip on what he’s doing.


Filed under: ARM, car hacks, slider

Shower Thoughts in Your Car

$
0
0

The subreddit for Shower Thoughts offers wisdom ranging from the profound to the mundane. For example: “Every time you cut a corner you make two more.” Apparently, [Harin] has a bit of an addiction to the subreddit. He’s been sniffing the CAN bus on his 2012 Hyundai Genesis and decided to display the top Shower Thought on his radio screen.

To manage the feat he used both a Raspberry Pi and an Arduino. Both devices had a MCP2515 to interface with two different CAN busses (one for the LCD display and the other for control messages which carries a lot of traffic.

The code is available on GitHub. There’s still work to do to make the message scroll, for example. [Harin] has other posts about sniffing the bus, like this one.

We’ve covered CAN bus quite a bit, including some non-automotive uses. We’ve even seen the CAN bus for model railroading.


Filed under: Arduino Hacks, car hacks, Raspberry Pi

Raspberry Pi Adds A Digital Dash To Your Car

$
0
0

Looking for a way to make your older car more hi-tech? Why not add a fancy digital display? This hack from [Greg Matthews] does just that, using a Raspberry Pi, a OBD-II Consult reader and an LCD screen to create a digital dash that can run alongside (or in front of ) your old-school analog dials.

[Greg’s] hack uses a Raspberry Pi Foundation display, which includes a touch screen, so you don’t need a mouse or other controls. Node.js displays the speed, RPM, and engine temperature (check engine lights and other warnings are planned additions) through a webpage displayed using Chromium. The Node page is pulling info from another program on the Pi which monitors the CAN Consult bus. It would be interesting to adapt this to use with more futuristic displays, maybe something like a pico projector and a 1-way mirror for a heads-up display.

To power the system [Greg] is using a Mausberry power supply which draws power from your car battery, but which also cleanly shuts down the Pi when the ignition is turned off so it won’t drain your battery. When you throw in an eBay sourced OBD-II Consult reader and the Consult Dash software that [Greg] wrote to interpret and display the data from the OBD-II Consult bus, you get a decent digital dash display. Sure, it isn’t a Tesla touchscreen, but at $170, it’s a lot cheaper. Spend more and you can easily move that 60″ from your livingroom out to your hoopty and still use a Raspberry Pi.

What kind of extras would you build into this system? Gamification of your speed? Long-term fuel averaging? Let us know in the comments.

UPDATE – This post originally listed this hack as working from the OBD-II bus. However, this car does not have OBD-II, but instead uses Consult, an older data bus used by Nissan. Apologies for any confusion!


Filed under: car hacks, Raspberry Pi

Reverse Engineering the Smart ForTwo CAN Bus

$
0
0

The CAN bus has become a defacto standard in modern cars. Just about everything electronic in a car these days talks over this bus, which makes it fertile ground for aspiring hackers. [Daniel Velazquez] is striking out in this area, attempting to decode the messages on the CAN bus of his Smart ForTwo.

[Daniel] has had some pitfalls – first attempts with a Beaglebone Black were somewhat successful in reading messages, but led to strange activity of the car and indicators. This is par for the course in any hack that wires into an existing system – there’s a high chance of disrupting what’s going on leading to unintended consequences.

Further work using an Arduino with the MCP_CAN library netted [Daniel] better results, but  it would be great to understand precisely why the BeagleBone was causing a disturbance to the bus. Safety is highly important when you’re hacking on a speeding one-ton metal death cart, so it pays to double and triple check everything you’re doing.

Thus far, [Daniel] is part way through documenting the messages on the bus, finding registers that cover the ignition and turn signals, among others. Share your CAN hacking tips in the comments. For those interested in more on the CAN bus, check out [Eric]’s great primer on CAN hacking – and keep those car hacking projects flowing to the tip line!


Filed under: car hacks

Reverse-Engineering the Peugeot 207’s CAN bus

$
0
0

Here’s a classic “one thing led to another” car hack. [Alexandre Blin] wanted a reversing camera for his old Peugeot 207 and went down a rabbit hole which led him to do some extreme CAN bus reverse-engineering with Arduino and iOS. Buying an expensive bezel, a cheap HDMI display, an Arduino, a CAN bus shield, an iPod touch with a ghetto serial interface cable that didn’t work out, a HM-10 BLE module, an iPad 4S, the camera itself, and about a year and a half of working on it intermittently, he finally emerged poorer by about 275€, but victorious in a job well done. A company retrofit would not only have cost him a lot more, but would have deprived him of everything that he learned along the way.

Adding the camera was the easiest part of the exercise when he found an after-market version specifically meant for his 207 model. The original non-graphical display had to make room for a new HDMI display and a fresh bezel, which cost him much more than the display. Besides displaying the camera image when reversing, the new display also needed to show all of the other entertainment system information. This couldn’t be obtained from the OBD-II port but the CAN bus looked promising, although he couldn’t find any details for his model initially. But with over 2.5 million of the 207’s on the road, it wasn’t long before [Alexandre] hit jackpot in a French University student project who used a 207 to study the CAN bus. The 207’s CAN bus system was sub-divided in to three separate buses and the “comfort” bus provided all the data he needed. To decode the CAN frames, he used an Arduino, a CAN bus shield and a python script to visualize the data, checking to see which frames changed when he performed certain functions — such as changing volume or putting the gear in reverse, for example.

The Arduino could not drive the HDMI display directly, so he needed additional hardware to complete his hack. While a Raspberry Pi would have been ideal, [Alexandre] is an iOS developer so he naturally gravitated towards the Apple ecosystem. He connected an old iPod to the Arduino via a serial connection from the Dock port on the iPod. But using the Apple HDMI adapter to connect to the display broke the serial connection, so he had to put his thinking cap back on. This time, he used a HM-10 BLE module connected to the Arduino, and replaced the older iPod Touch (which didn’t support BLE) with a more modern iPhone 4S. Once he had all the bits and pieces working, it wasn’t too long before he could wrap up this long drawn upgrade, but the final result looks as good as a factory original. Check out the video after the break.

It’s great to read about these kinds of hacks where the hacker digs in his feet and doesn’t give up until it’s done and dusted. And thanks to his detailed post, and all the code shared on his GitHub repository, it should be easy to replicate this the second time around, for those looking to upgrade their old 207. And if you’re looking for inspiration, check out this great Homemade Subaru Head Unit Upgrade.


Filed under: car hacks, slider

Building an OBD Speed Pulse: Behold the ICE

$
0
0

I am a crappy software coder when it comes down to it. I didn’t pay attention when everything went object oriented and my roots were always assembly language and Real Time Operating Systems (RTOS) anyways.

So it only natural that I would reach for a true In-Circuit-Emulator (ICE) to finish of my little OBDII bus to speed pulse generator widget. ICE is a hardware device used to debug embedded systems. It communicates with the microcontroller on your board, allowing you to view what is going on by pausing execution and inspecting or changing values in the hardware registers. If you want to be great at embedded development you need to be great at using in-circuit emulation.

Not only do I get to watch my mistakes in near real time, I get to make a video about it.

Getting Data Out of a Vehicle

I’ve been working on a small board which will plug into my car and give direct access to speed reported on the Controller Area Network (CAN bus).

To back up a bit, my last video post was about my inane desire to make a small assembly that could plug into the OBDII port on my truck and create a series of pulses representing the speed of the vehicle for my GPS to function much more accurately. While there was a wire buried deep in the multiple bundles of wires connected to the vehicle’s Engine Control Module, I have decided for numerous reasons to create my own signal source.

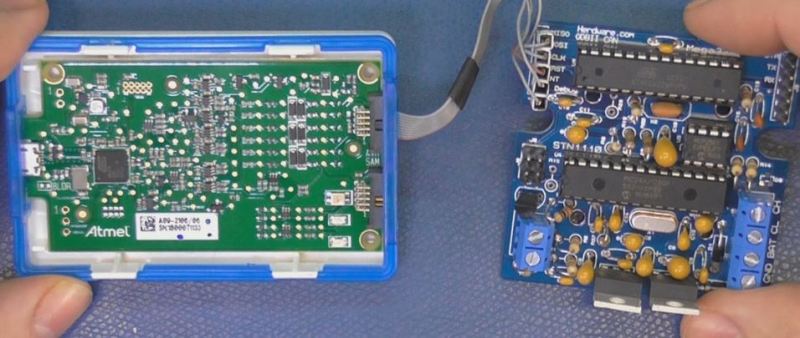
At the heart of my project is the need to convert the OBDII port and the underlying CAN protocol to a simple variable representing the speed, and to then covert that value to a pulse stream where the frequency varied based on speed. The OBDII/CAN Protocol is handled by the STN1110 chip and converted to ASCII, and I am using an ATmega328 like found on a multitude of Arduino’ish boards for the ASCII to pulse conversion. I’m using hardware interrupts to control the signal output for rock-solid, jitter-free timing.

Walk through the process of using an In-Circuit Emulator in the video below, and join me after the break for a few more details on the process.
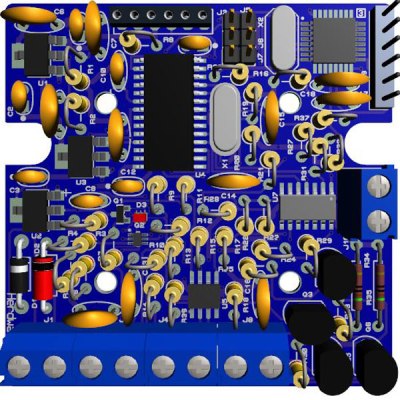
The Hardware

I revised the board since the last video and removed the support for the various protocols other than CAN, which is the non-obsolete protocol of the bunch. By removing a bunch of parts I was able to change the package style to through-hole which is easier for many home hobbyists, so you can leave the solder-paste in the ‘fridge.

The “Other Connector” on your Arduino

Unlike the Arduino which is ready to talk to your USB port when you take it out of the box, the ATmega chips arrive without any knowledge of how to go and download code, in other words it doesn’t have a boot loader. Consequently I have the In-Circuit-Serial-Programming (ICSP) pins routed to a pin header on my board so that I can program the part directly.

On this connector you’ll find the Reset line, which means with this header I can use a true ICE utilizing the debugWIRE protocol. Since the vast majority of designs that use an AVR chip do not repurpose the reset pin for GPIO, it is a perfect pin to use for ICE. All of the communications during the debug process will take place on the reset pin.

Enter the ICE

When designing a computer from scratch there is always the stage where nothing yet works. Simply put, a microprocessor circuit cannot work until almost every part of the design works; RAM, ROM, and the underlying buses all need to (mostly) work before simple things can be done. As a hardware engineer by trade I would always reach for an ICE to kick off the implementation; only after the Beta release would the ICE start to gather dust in the corner.

In the case of the ATmega, the debugging capabilities are built into the microcontroller itself. This is a much more straightforward implementation than the early days when we had to have a second isolated processor running off-board with its own local RAM/ROM.

One note mentioned in the video is that a standard Arduino’ish board needs to have the filter capacitors removed from the RESET line to allow the high speed data on the line for its debugWIRE usage.

The ICE I am using here is the one made by Atmel, and is compatible with Atmel Studio, there are also other models available such as the AVR Dragon.

ICEyness

The ICE allows us to download and single step our code while being able to observe and overwrite RAM and I/O Registers from the keyboard. We are able to watch the program step by step or look underneath at the actual assembly code generated by the compiler. We can watch variables and locations directly in RAM or watch the C language counterparts. It’s also possible to jump over a sub-routine call in the instance of just wanting to see the result without all of the processing.

It’s worth your time to see even a glimpse of the capabilities of an ICE in action. I recommend that you watch the video where the debugging begin.

Final Words

This video was really about finishing the OBDII circuit so I didn’t really have the time to go over everything an ICE can do, maybe I will do a post dedicated to just the ICE and development environment next time.


Filed under: Arduino Hacks, Hackaday Columns, Microcontrollers, Skills, slider
Viewing all 56 articles
Browse latest View live


<script src="https://jsc.adskeeper.com/r/s/rssing.com.1596347.js" async> </script>